If you are looking for Top 5 Online Video Players For Blogger with CDN Link and HTML Code then this post is just for you.
I am Monish. I have been involved with coding for a long time. I will give you proper advice from long experience so let's start.
See Blogger has given an option to upload videos, but I don't think the design of that video player is very good. So in today's post I will share you the best 5 custom video players where you can present your video in front of everyone in a very beautiful way just by adding the video source link.
What is an Online Video Player?
HTML5 Video Player is a JavaScript library that adds controls to the HTML5 video element. This makes sure that all browsers look the same.
HTML5 online video players let you watch videos in a web browser without needing to install any extra plugins. We put in a Flash player a while ago so we could stream videos. HTML5 video players, on the other hand, make it easy to add native video players to your site. You can still embed YouTube videos, but here's a better way to show your visitors videos, whether you're a personal trainer making videos to show how to do exercises or a social media influencer making a funny video.
You only need to use the video element to make an HTML5 video player. Set the video's width and height, and change its attributes to add functions like play and pause, or to make it start playing automatically.
How to get video source link on blogger website?
How to do this is discussed below.
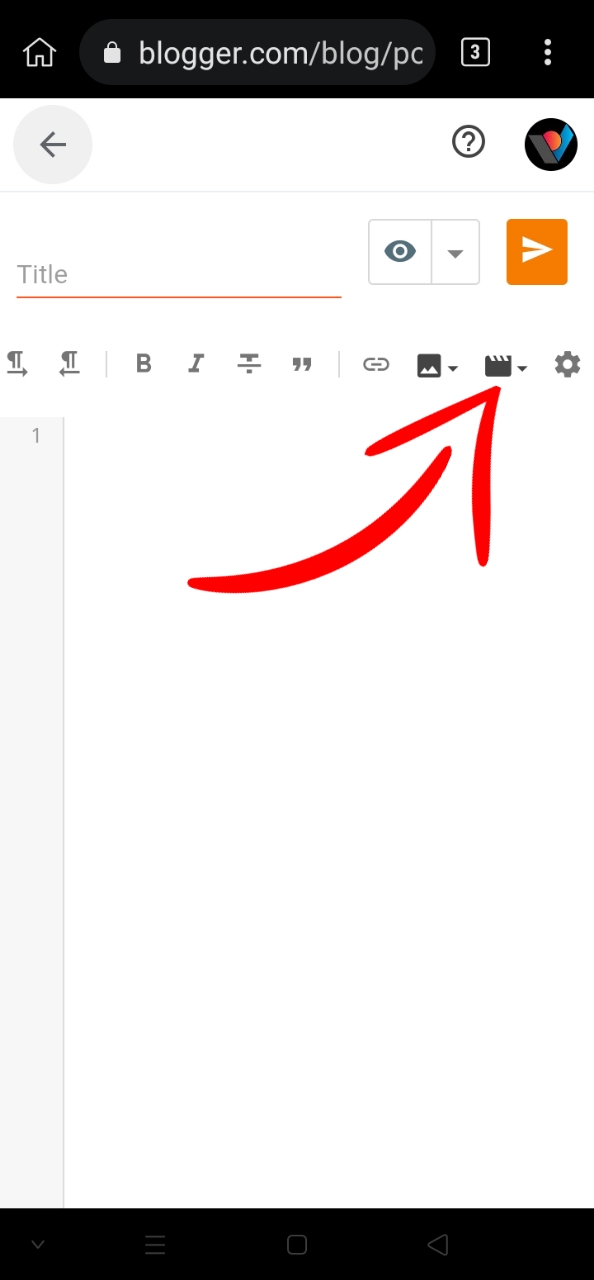
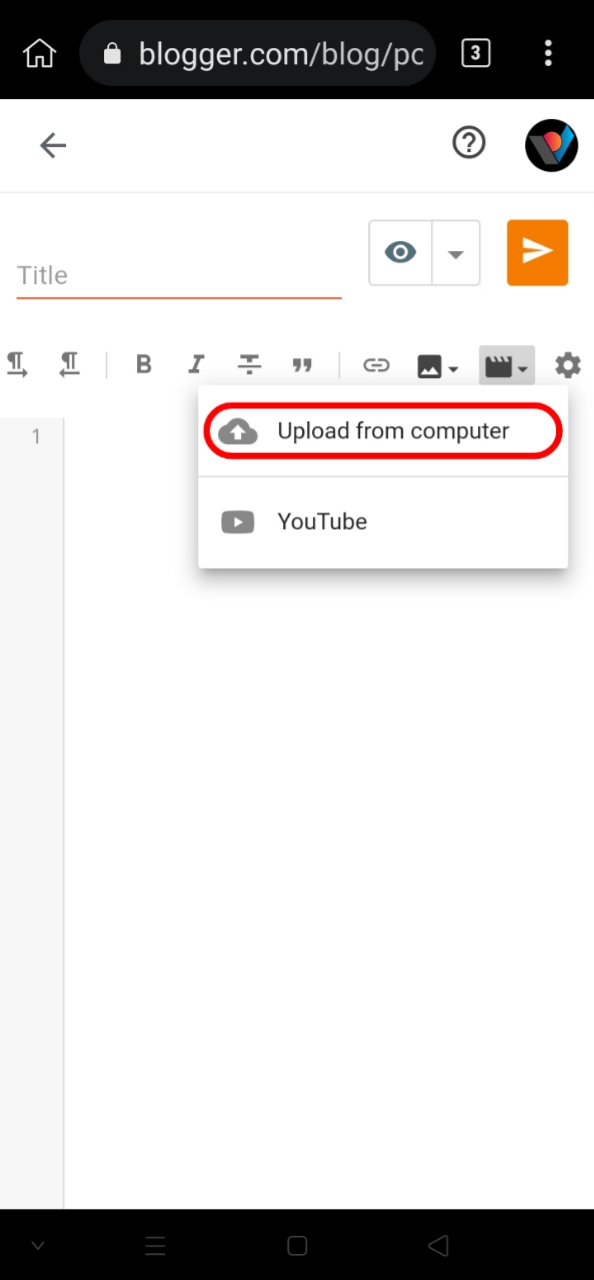
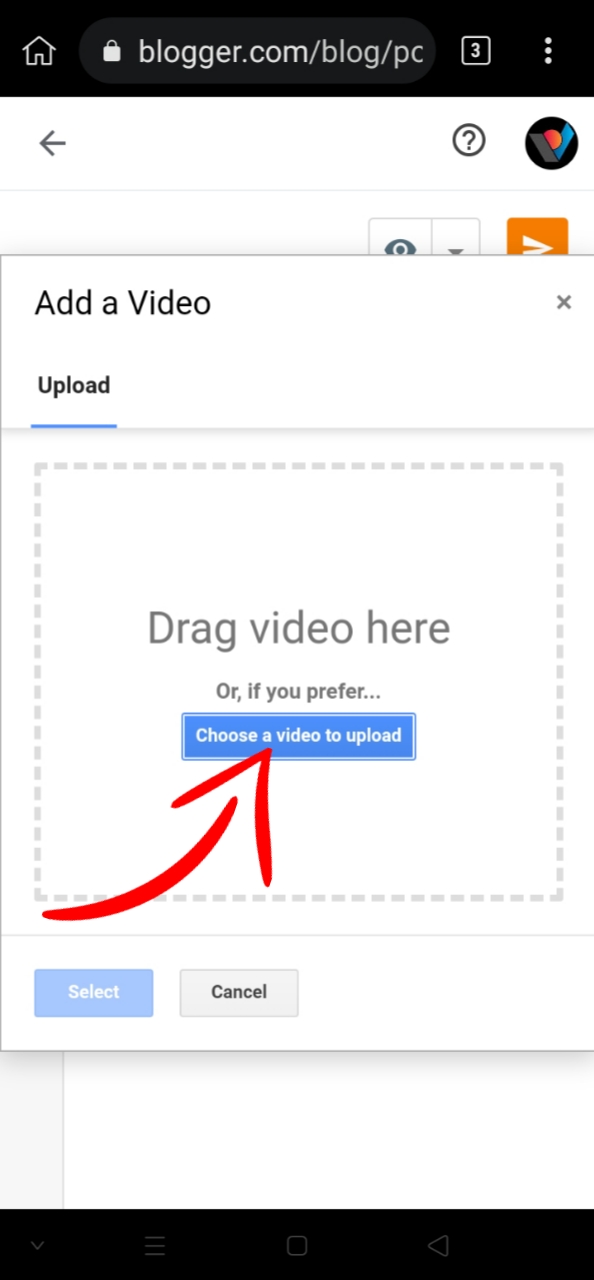
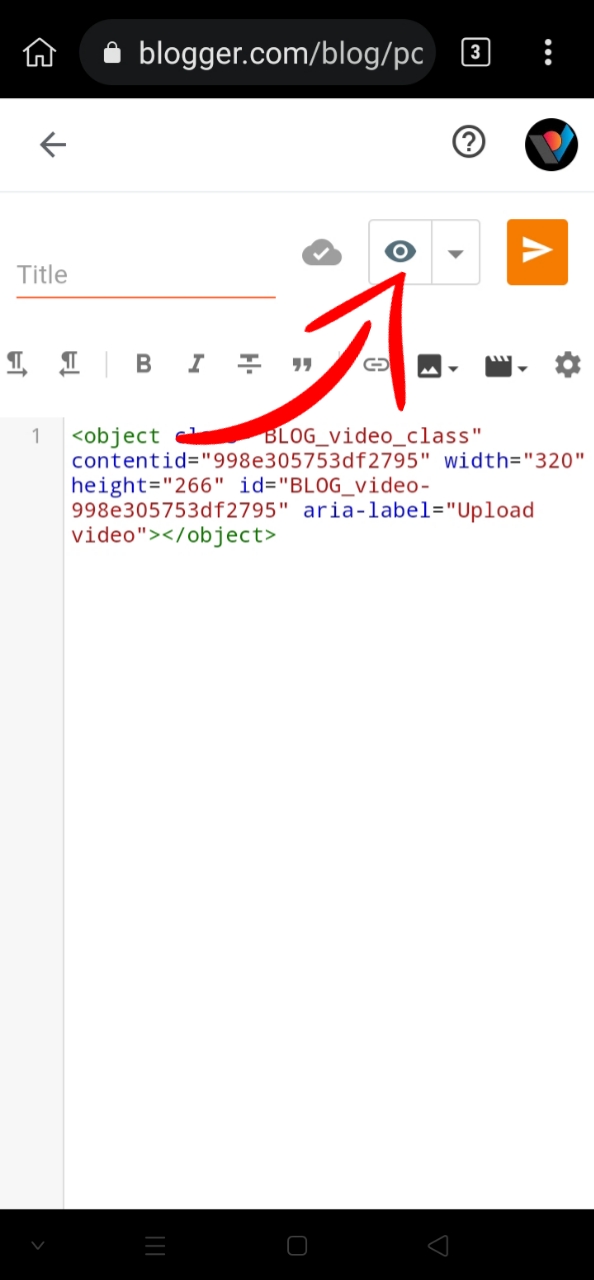
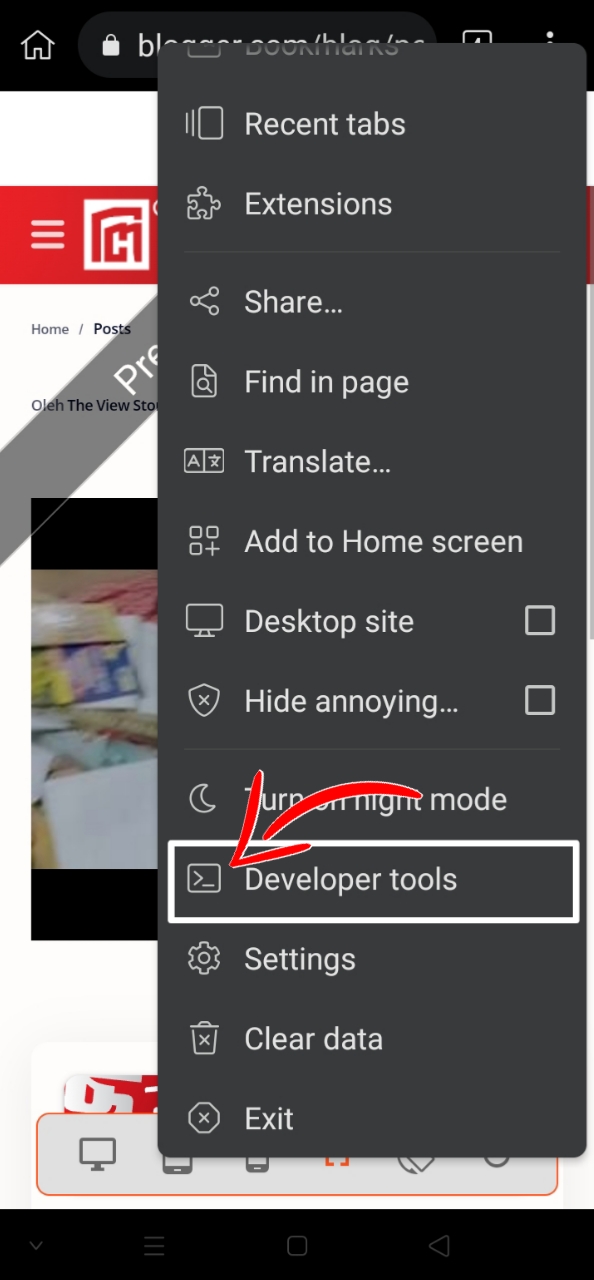
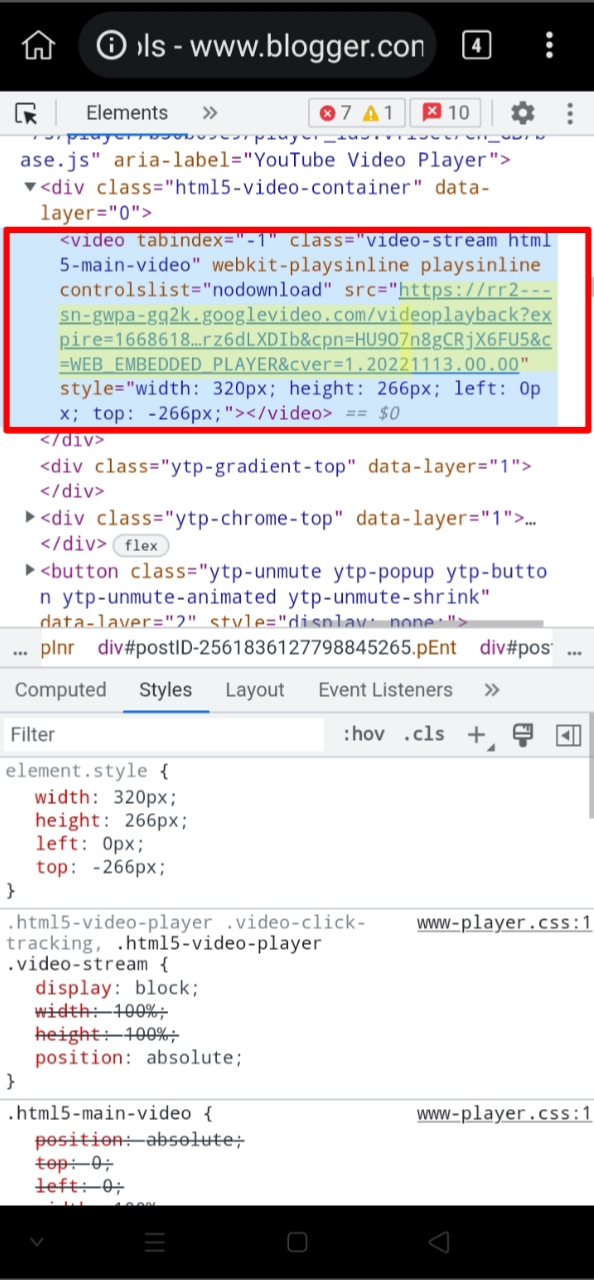
If you're using a computer or desktop, you'll get the option to do the inspector element with a mouse click, for those who want to do it on mobile, I recommend a browser app that you can try
Kiwi Browser
How to get image source link on blogger website?
How to do this is discussed below.


So let's see how to make a beautiful video player with this video and photo source link.
See I've told you before that I'll be using a custom video player for this, but today's post is about how to use it.
Top 5 Online Video Players For Blogger with CDN Link and HTML Code 2022
Next, let's take a look at the top 5 online video players that work with HTML5.
1. Plyr
Plyr is a simple, lightweight, accessible and customizable HTML5, YouTube and Vimeo media player that supports modern browsers.
How to use Plyr video player in Blogger
Important!Before we start adding codes in XML, I will recommend you to take a Backup of your current theme. By chance if any problem occurs, you can restore it later.
Step 1: First of all Login to your Blogger Dashboard.
Step 2: On Blogger Dashboard, click Theme.
Step 3: Click the arrow down icon next to 'customize' button.
Step 4: Click Edit HTML, you will be redirected to editing page.
Step 5: Now search the code </head> or </head> and paste the following CSS CDN Codes just before to it.
<link rel='stylesheet' href="https://unpkg.com/plyr@3/dist/plyr.css" />
Step 6: And search the code </body> or </body>Tag and paste the following JS CDN Codes just before to it.
<script src='https://unpkg.com/plyr@3/dist/plyr.min.js'></script>
Step 7: Save the html changes by clicking on this icon .
Step 8: Then go to the page/post/layout or place which you want to add this Video Player.
Step 9: Then if you are doing this in page/post then In post editor view, click icon at the bottom right of the title.Two options will appear: HTML view and Writing view, Select 'HTML View'.
Step 10: Now paste the following HTML code to that place.
<div class="container_by_the_pro_project">
	<video controls crossorigin playsinline poster="your_img.jpg">
		 <source src="your_video_576.mp4" type="video/mp4" size="576">
			<source src="your_video_720.mp4" type="video/mp4" size="720">
			<source src="your_video_1080.mp4" type="video/mp4" size="1080">

			<!-- Caption files -->
			<track kind="captions" label="English" srclang="en" src="your_caption.en.vtt"
					default>
			<track kind="captions" label="Français" srclang="fr" src="your_caption.fr.vtt">
		</div>
<!--Extra CSS by The Pro Project-->
<style>.container_by_the_pro_project { border-radius: 1rem; box-shadow: 10px 20px 20px #27272766; overflow: hidden; position: absolute; top: 50%; left: 50%; width: 95%; transform: translate(-50%, -50%); border-style: solid; border-color: #d3e0ea; border-width: 5px; font-family: 'Rubik', sans-serif; }</style>
You can change html texts as you want in the code box!
Add the source link of your video or photo by changing the photo and video source link.
Step 11: Then Save or Publish.
2. Videojs
Video.js is a web video player built from the ground up for an HTML5 world. It supports HTML5 video and modern streaming formats, as well as YouTube, Vimeo, and even Flash (through plugins, more on that later).
It supports video playback on desktop and mobile devices. The project was started mid 2010, and now has hundreds of contributors and is used on over 450,000 websites.
How to use Video.js video player in Blogger
Important!Before we start adding codes in XML, I will recommend you to take a Backup of your current theme. By chance if any problem occurs, you can restore it later.
Step 1: First of all Login to your Blogger Dashboard.
Step 2: On Blogger Dashboard, click Theme.
Step 3: Click the arrow down icon next to 'customize' button.
Step 4: Click Edit HTML, you will be redirected to editing page.
Step 5: Now search the code </head> or </head> and paste the following CSS CDN Codes just before to it.
 <link href="https://vjs.zencdn.net/7.20.3/video-js.css" rel="stylesheet" />

  <!-- If you'd like to support IE8 (for Video.js versions prior to v7) -->
  <!-- <script src="https://vjs.zencdn.net/ie8/1.1.2/videojs-ie8.min.js"></script> -->
Step 6: And search the code </body> or </body>Tag and paste the following JS CDN Codes just before to it.
<script src="https://vjs.zencdn.net/7.20.3/video.min.js"></script>
Step 7: Save the html changes by clicking on this icon .
Step 8: Then go to the page/post/layout or place which you want to add this Video Player.
Step 9: Then if you are doing this in page/post then In post editor view, click icon at the bottom right of the title.Two options will appear: HTML view and Writing view, Select 'HTML View'.
Step 10: Now paste the following HTML code to that place.
  <video id="my_video_1" class="video-js vjs-default-skin" width="100%"
      controls preload="none" poster='https://encrypted-tbn0.gstatic.com/images?q=tbn:ANd9GcTIw58x9LfXP5h29F1o3PH_4zONq5ETJdCvgBPO_Oxz-Dy3z8S2S8ZFO7eS&s=10'
      data-setup='{ "aspectRatio":"16:9", "playbackRates": [1, 1.5, 2] }'>
    <source src="https://vjs.zencdn.net/v/oceans.mp4" type='video/mp4' />
    <source src="https://vjs.zencdn.net/v/oceans.webm" type='video/webm' />
  </video>
<style> /* Player Skin Designer for Video.js http://videojs.com To customize the player skin edit the CSS below. Click "details" below to add comments or questions. This file uses some SCSS. Learn more at http://sass-lang.com/guide) This designer can be linked to at: https://codepen.io/heff/pen/EarCt/left/?editors=010 */ // The following are SCSS variables to automate some of the values. // But don't feel limited by them. Change/replace whatever you want. // The color of icons, text, and the big play button border. // Try changing to #0f0 $primary-foreground-color: #fff; // #fff default // The default color of control backgrounds is mostly black but with a little // bit of blue so it can still be seen on all-black video frames, which are common. // Try changing to #900 $primary-background-color: #2B333F; // #2B333F default // Try changing to true $center-big-play-button: false; // true default .video-js { /* The base font size controls the size of everything, not just text. All dimensions use em-based sizes so that the scale along with the font size. Try increasing it to 15px and see what happens. */ font-size: 10px; /* The main font color changes the ICON COLORS as well as the text */ color: $primary-foreground-color; } /* The "Big Play Button" is the play button that shows before the video plays. To center it set the align values to center and middle. The typical location of the button is the center, but there is trend towards moving it to a corner where it gets out of the way of valuable content in the poster image.*/ .vjs-default-skin .vjs-big-play-button { /* The font size is what makes the big play button...big. All width/height values use ems, which are a multiple of the font size. If the .video-js font-size is 10px, then 3em equals 30px.*/ font-size: 3em; /* We're using SCSS vars here because the values are used in multiple places. Now that font size is set, the following em values will be a multiple of the new font size. If the font-size is 3em (30px), then setting any of the following values to 3em would equal 30px. 3 * font-size. */ $big-play-width: 3em; /* 1.5em = 45px default */ $big-play-height: 1.5em; line-height: $big-play-height; height: $big-play-height; width: $big-play-width; /* 0.06666em = 2px default */ border: 0.06666em solid $primary-foreground-color; /* 0.3em = 9px default */ border-radius: 0.3em; @if $center-big-play-button { /* Align center */ left: 50%; top: 50%; margin-left: -($big-play-width / 2); margin-top: -($big-play-height / 2); } @else { /* Align top left. 0.5em = 15px default */ left: 0.5em; top: 0.5em; } } /* The default color of control backgrounds is mostly black but with a little bit of blue so it can still be seen on all-black video frames, which are common. */ .video-js .vjs-control-bar, .video-js .vjs-big-play-button, .video-js .vjs-menu-button .vjs-menu-content { /* IE8 - has no alpha support */ background-color: $primary-background-color; /* Opacity: 1.0 = 100%, 0.0 = 0% */ background-color: rgba($primary-background-color, 0.7); } // Make a slightly lighter version of the main background // for the slider background. $slider-bg-color: lighten($primary-background-color, 33%); /* Slider - used for Volume bar and Progress bar */ .video-js .vjs-slider { background-color: $slider-bg-color; background-color: rgba($slider-bg-color, 0.5); } /* The slider bar color is used for the progress bar and the volume bar (the first two can be removed after a fix that's coming) */ .video-js .vjs-volume-level, .video-js .vjs-play-progress, .video-js .vjs-slider-bar { background: $primary-foreground-color; } /* The main progress bar also has a bar that shows how much has been loaded. */ .video-js .vjs-load-progress { /* For IE8 we'll lighten the color */ background: lighten($slider-bg-color, 25%); /* Otherwise we'll rely on stacked opacities */ background: rgba($slider-bg-color, 0.5); } /* The load progress bar also has internal divs that represent smaller disconnected loaded time ranges */ .video-js .vjs-load-progress div { /* For IE8 we'll lighten the color */ background: lighten($slider-bg-color, 50%); /* Otherwise we'll rely on stacked opacities */ background: rgba($slider-bg-color, 0.75); }</style>
You can change html texts as you want in the code box!
Add the source link of your video or photo by changing the photo and video source link.
Step 11: Then Save or Publish.
3. Mooviejs
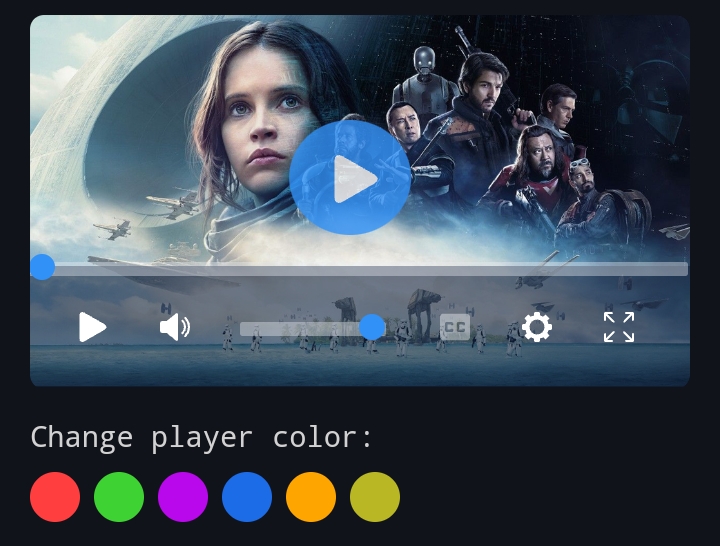
Moovie Media player made for movies
How to use Moovie video player in Blogger
Important!Before we start adding codes in XML, I will recommend you to take a Backup of your current theme. By chance if any problem occurs, you can restore it later.
Step 1: First of all Login to your Blogger Dashboard.
Step 2: On Blogger Dashboard, click Theme.
Step 3: Click the arrow down icon next to 'customize' button.
Step 4: Click Edit HTML, you will be redirected to editing page.
Step 5: Now search the code </head> or </head> and paste the following CSS CDN Codes just before to it.
<link rel="stylesheet" href="https://cdn.jsdelivr.net/gh/SH20RAJ/Sopplayer/mooviejs/css/moovie.min.css">
Step 6: And search the code </body> or </body>Tag and paste the following JS CDN Codes just before to it.
<script src="https://cdn.jsdelivr.net/gh/SH20RAJ/Sopplayer/mooviejs/js/moovie.min.js"></script>
Step 7: Save the html changes by clicking on this icon .
Step 8: Then go to the page/post/layout or place which you want to add this Video Player.
Step 9: Then if you are doing this in page/post then In post editor view, click icon at the bottom right of the title.Two options will appear: HTML view and Writing view, Select 'HTML View'.
Step 10: Now paste the following HTML code to that place.
<video id="example1" poster="https://github.com/SH20RAJ/Sopplayer/blob/main/sample.png?raw=true">
  <source src="https://bit.ly/bbsamplevideo" type="video/mp4">

  <track kind="captions" label="English" srclang="en" src="https://cdn.jsdelivr.net/gh/BMSVieira/moovie.js@main/demo-template/subtitles/en.vtt">
  Your browser does not support the video tag.
</video>
<script>
document.addEventListener("DOMContentLoaded", function() {
   video1 = new Moovie({
      selector: "#example1",
      config: {
          controls : {
              playtime : true,
              mute : true,
              volume : true,
              subtitles : true,
              config : true,
              fullscreen : true,
              submenuCaptions : true,
              submenuOffset : true,
              submenuSpeed : true,
              allowLocalSubtitles : true
          }
      }
   });
});
</script>
You can change html texts as you want in the code box!
Add the source link of your video or photo by changing the photo and video source link.
Step 11: Then Save or Publish.
4. MediaElement.js
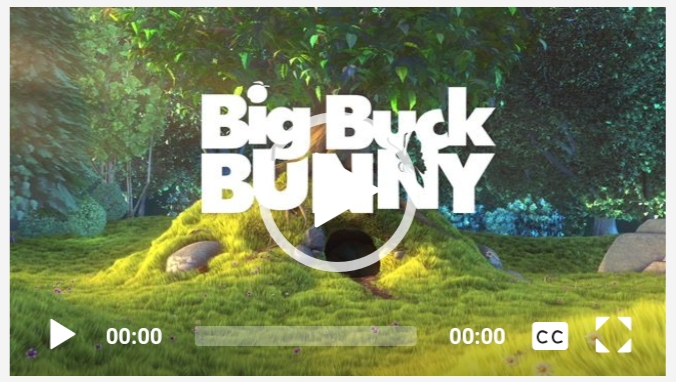
This is a jQuery plugin that lets you use a single H.264 file with the video tag. If your online video player doesn't work with HTML5, MediaElementJS will replace it with one that works with Flash or Silverlight. Everyone can contribute to improving this product as it’s free and open-source.
How to use MediaElement.js video player in Blogger
Important!Before we start adding codes in XML, I will recommend you to take a Backup of your current theme. By chance if any problem occurs, you can restore it later.
Step 1: First of all Login to your Blogger Dashboard.
Step 2: On Blogger Dashboard, click Theme.
Step 3: Click the arrow down icon next to 'customize' button.
Step 4: Click Edit HTML, you will be redirected to editing page.
Step 5: And search the code </body> or </body>Tag and paste the following JS CDN Codes just before to it.
<script src="https://code.jquery.com/jquery-3.2.1.min.js"
  integrity="sha256-hwg4gsxgFZhOsEEamdOYGBf13FyQuiTwlAQgxVSNgt4="
  crossorigin="anonymous"></script>
Step 6: Save the html changes by clicking on this icon .
Step 7: Then go to the page/post/layout or place which you want to add this Video Player.
Step 8: Then if you are doing this in page/post then In post editor view, click icon at the bottom right of the title.Two options will appear: HTML view and Writing view, Select 'HTML View'.
Step 9: Now paste the following HTML code to that place.
 <video id="video1" width="100%" height="195" poster="https://bit.ly/bbsampleposter">
    <source src="https://bit.ly/bbsamplevideo" type="video/mp4">
    Your browser does not support HTML5 video.
</video>
<script>$('video, audio').mediaelementplayer({ // Do not forget to put a final slash (/) pluginPath: 'https://cdnjs.com/libraries/mediaelement/', // this will allow the CDN to use Flash without restrictions // (by default, this is set as `sameDomain`) shimScriptAccess: 'always' // more configuration });</script>
You can change html texts as you want in the code box!
Add the source link of your video or photo by changing the photo and video source link.
Step 11: Then Save or Publish.
5 KWG Video Player
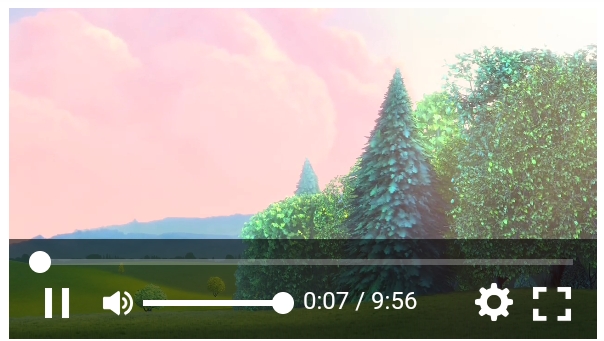
KWG Video Player is a free custom HTML5 video player. It is written in Vanilla JavaScript and no library is required for it to run.
How to use KWG Video Player in Blogger
Important!Before we start adding codes in XML, I will recommend you to take a Backup of your current theme. By chance if any problem occurs, you can restore it later.
Step 1: First of all Login to your Blogger Dashboard.
Step 2: On Blogger Dashboard, click Theme.
Step 3: Click the arrow down icon next to 'customize' button.
Step 4: Click Edit HTML, you will be redirected to editing page.
Step 5: Now search the code </head> or </head> and paste the following CSS CDN Codes just before to it.
<link rel="stylesheet" type="text/css" href="https://cdn.jsdelivr.net/gh/webgadgets/KwgVideoPlayer@master/kwg-video-player.css" />
Step 6: And search the code </body> or </body>Tag and paste the following JS CDN Codes just before to it.
<script src="https://cdn.jsdelivr.net/gh/webgadgets/KwgVideoPlayer@master/kwg-video-player.js"></script>
Step 7: Save the html changes by clicking on this icon .
Step 8: Then go to the page/post/layout or place which you want to add this Video Player.
Step 9: Then if you are doing this in page/post then In post editor view, click icon at the bottom right of the title.Two options will appear: HTML view and Writing view, Select 'HTML View'.
Step 10: Now paste the following HTML code to that place.
<video id="video1" width="700" height="525" poster="https://bit.ly/bbsampleposter">
    <source src="https://bit.ly/bbsamplevideo" type="video/mp4">
    Your browser does not support HTML5 video.
</video>
<script>
    new kwgVideo('#video1');
  new kwgVideo('#video2');
</script>
You can change html texts as you want in the code box!
Add the source link of your video or photo by changing the photo and video source link.
Step 11: Then Save or Publish.
Terms of Use
To appreciate our workshop, consider keeping the credits in canons.
We do not allow to rewrite this post in any manner. Do not copy this post, canons or any part from this composition without authorization, it's rigorously prohibited.However, Legal conduct will be taken, If you do so.
Conclusion
Hope this Top 5 Online Video Players For Blogger with CDN Link and HTML Code 2022 article will be useful to you, If you have any dubieties or facing any issues while installing it also you can ask me in the comment, Do share with your musketeers, Thanks for visiting, Have a nice day!
Our All Posts Are Protected By DMCA. So Don't Try To Copy Our Posts And Reproduction In Any Way Is Strictly Prohibited! Or else Legal Actions Will Be Taken. © The Pro Project | All Rights Reserved
© Copyright:
www.the-pro-project.blogspot.com